Ace Combat 8 Mission 13, “The People of the Lost Country,” begins as a reconnaissance flight but becomes a long escort operation. The reliable route is to stay close enough to the resistance transport to answer sudden threats, destroy MANPADS as soon as they reveal themselves, and prioritize anything actively attacking the transport. Bring a balanced air-to-air and air-to-ground loadout; this is not a sortie where specializing completely in either role is comfortable.
The mission is Operation Twin Birds. Its difficult moments come from target switching rather than one powerful opponent: fighters approach from the air, portable missile teams appear briefly on the ground, and later objective changes force you to clear enemies quickly. Do not waste time chasing harmless targets far from the escort route.
Mission 13 objectives and route
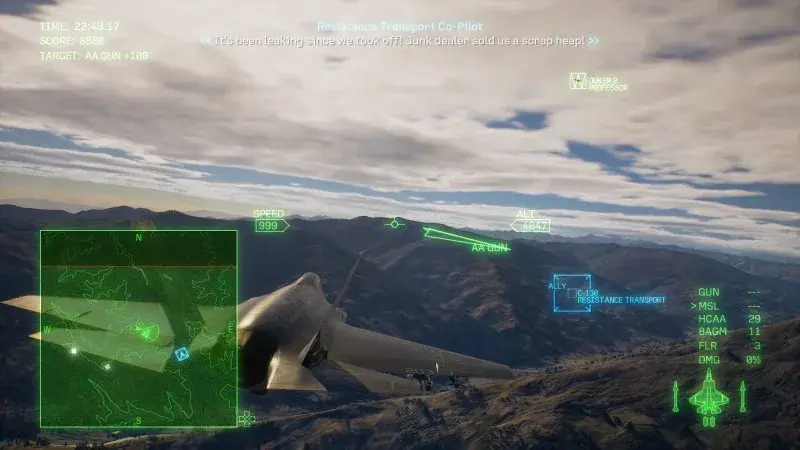
Stay close to the resistance transport while clearing threats along its route.
Your original assignment is to fly reconnaissance with Joker 1 and Joker 2 while an unmanned tanker supports the journey. After contact with a resistance aircraft near Rio Bajo, Joker Flight abandons the reconnaissance objective and agrees to protect a transport carrying weapons for an uprising.
The playable sequence can be understood as five connected tasks:
- Eliminate the fighters threatening the resistance aircraft.
- Escort the transport along its route while removing air defenses and interceptors.
- Destroy MANPADS when their positions become detectable.
- Secure the improvised landing area and protect the grounded transport while its cargo is unloaded.
- Complete the subsequent aerial-refueling approach.
The transport is the center of the mission. New contacts may tempt you away, but the most useful target is normally the one that can damage the escort target first. Stay within quick interception distance and return immediately after every attack pass.
Recommended aircraft and weapon balance
The briefing explicitly warns that Joker Flight will face both air-to-air and air-to-ground threats. A multirole aircraft is therefore the simplest choice. If you prefer a fighter, make sure its standard missiles and gun are comfortable enough for quick attacks on small ground targets. If you prefer an attacker, avoid a setup that makes repeated fighter interceptions slow or awkward.
Choose equipment according to these practical needs:
- Fast target changes: You must move repeatedly between airborne attackers and ground launchers.
- Accurate ground attacks: MANPADS offer short engagement windows and may appear near terrain or trees.
- Reliable fighter kills: Leaving an interceptor alive for another turning fight gives it more time to attack the transport.
- Controlled ammunition use: Save some air-to-air capacity for the attacks that occur after the transport reaches the road.
A broad-area ground weapon can make a pass more forgiving, but it does not replace target identification. Likewise, a dedicated air-to-air weapon helps with later aircraft but cannot solve the portable-launcher phases by itself. The best loadout is the one that lets you destroy a marked ground target in one deliberate pass and then re-engage a fighter without a long setup.
Defeating the opening interceptors
Once Joker Flight commits to the rescue, enemy fighters move against the resistance aircraft. Turn toward these attackers immediately and use the objective marker to avoid locking onto unrelated contacts. A clean opening reduces the amount of pressure carried into the longer escort phase.
Attack from a position that leaves you pointed roughly along the transport’s route after the kill. That reduces the time spent turning back toward the objective. If an enemy begins maneuvering away from the transport, consider breaking off rather than following it into a prolonged chase. Joker 2 is present, but your safest plan is to treat every immediate threat as your responsibility instead of waiting for an ally to finish it.
After the first attackers are gone, move forward with the transport rather than circling the site of the last kill. The mission introduces new threats along the route, and arriving late can leave the unarmed aircraft relying only on its limited defensive countermeasures.
Escorting the resistance transport
Keep the transport visible on the radar and fly a loose protective orbit around its direction of travel. You do not need to sit directly beside it. A position slightly ahead or to one side gives you room to turn toward ground contacts without crossing the transport’s flight path.
Use this priority order when several targets appear together:
- A visible launcher preparing to fire on the transport.
- A marked MANPADS position close to the route.
- An aircraft making an attack run on the transport.
- Fixed anti-air weapons covering the next section of the route.
- Enemies that are present but not currently pressuring the escort target.
This is a tactical priority list, not a guarantee that the game will always mark contacts in that order. Listen for warnings, watch the escort-target status, and be ready to interrupt your current attack. One extra pass against a distant fighter is rarely worth allowing a portable missile team to fire uncontested.
Finding and destroying MANPADS
MANPADS are the main visibility problem in Mission 13. The mission states that these portable launchers are difficult to find and can only be detected shortly before they launch. Radio warnings may identify them as portable missiles or infantry with MANPADS, while later calls place them among trees, on hillsides, or in wooded valleys.
When the warning sounds, stop scanning distant aircraft and check the ground near the transport’s forward route. Select the new ground marker as soon as it appears. Roll into a controlled attack rather than diving so steeply that terrain blocks the shot or forces a desperate recovery.
A consistent response looks like this:
- Note the transport’s direction before turning away from it.
- Acquire the newly revealed ground contact instead of cycling through every radar target.
- Align early and fire only when the shot is clear.
- Confirm the launcher is destroyed before climbing away.
- Recheck the transport and nearby fighters immediately.
Do not assume that passing one launcher means the route is safe. The mission introduces more MANPADS in later sections, including near the planned landing area. Remaining close to the transport shortens your response time when the next position appears.
Spoiler warning: The next section reveals the identity of a mid-mission enemy group.
Handling separatist fighters and later air waves
Some of the hostile pilots are former FCU personnel fighting as separatists. Their dialogue explains the political dispute, but it does not change the practical objective: they are attacking the transport and must be intercepted.
Avoid letting their escorts pull you into a wide dogfight. Destroy whichever aircraft is lined up on the transport, then reassess. Additional threats later include Harriers and attack helicopters alongside ground defenses. Because these contacts can overlap with MANPADS warnings, keep each attack short. Fire, confirm the result, and return to the escort corridor instead of extending far beyond it.
If your special weapon ammunition is running low, reserve it for contacts that are difficult to reach quickly. Standard missiles and the gun remain useful against isolated targets, provided you approach with enough time to aim rather than spraying ammunition during a high-speed turn.
Spoiler warning: The next section reveals the transport’s mechanical emergency.
Responding to the fuel leak
The transport eventually reports that it has been leaking fuel since takeoff and may not reach an airfield. This changes the destination, but not your immediate role. Continue clearing its route while the crew searches for somewhere to land.
Do not fly far ahead in anticipation of the new landing site. The route still contains portable missile teams and airborne attackers, and the damaged aircraft can continue taking fire. Stay close enough to react to warnings, especially when the transport begins losing altitude or reports further damage.
The crew ultimately chooses a road as an improvised landing area. As soon as the landing-site contacts appear, shift from moving escort to rapid area clearance. The transport cannot safely begin its approach while the road and surrounding terrain remain covered by hostile launchers.
Spoiler warning: The next section reveals the hidden bomb and timed unloading sequence.
Clearing the road landing zone and bomb timer
Before the landing, the resistance crew learns that a bomb was hidden in the cargo. The stated timer is four minutes. Treat this as the signal to stop taking optional engagements and clear the landing zone as efficiently as possible.
Destroy the portable missile troops around the drop zone first, followed by other contacts that can fire on the approach. Once the landing zone is reported clear, the transport descends and lands on the road. You do not control the transport during this sequence; maintain separation and prepare for the next wave rather than following it down at low altitude.
The objective continues after touchdown. Enemy aircraft approach while the resistance fighters unload the weapons, and attacks interrupt that work. Climb to a useful interception altitude, face the incoming contacts, and eliminate them before they can establish repeated passes over the road.
Keep these points in mind during the unloading defense:
- Remain near the road instead of chasing a retreating target across the map.
- Use the radar and target counter to locate the final attackers quickly.
- Make decisive missile shots; a damaged enemy that remains airborne can still delay unloading.
- Preserve enough altitude to turn onto another contact without risking the ground.
- Continue until the mission confirms that all relevant targets are destroyed.
The bomb explodes after the resistance crew removes what it can from the aircraft. Finishing the attackers promptly creates the opening needed for that evacuation, but the displayed countdown should not be treated as a promise that the explosion will wait for zero.
Spoiler warning: The next section describes Mission 13’s ending.
Completing the final refueling sequence
After the road defense, Joker Flight returns to the tanker for another refueling sequence. Approach the rear of the unmanned tanker and align your probe with the drogue. Reduce speed when instructed, make small corrections, and avoid aggressive pitch or yaw inputs near the connection point.
The guidance calls narrow the distance as you approach. Use them to judge closure instead of rushing the last few yards. Once aligned, hold a steady heading until the connection completes.
The sequence then becomes a story event: the drogue fails to release, an emergency override does not solve the problem, and the tanker catches fire. The pilots eject, setting up the following mission in enemy territory. These events are scripted narrative outcomes, not signs that you failed the refueling approach.
Common failure patterns and corrections
- Chasing fighters away from the route: Break off once the enemy is no longer the immediate threat and return to the transport.
- Missing MANPADS markers: Listen for the portable-missile warning, look near the route ahead, and attack the new ground contact immediately.
- Overshooting small ground targets: Begin alignment earlier, reduce unnecessary speed, and use one controlled pass rather than a sharp last-second dive.
- Spending all specialized ammunition early: Use standard weapons on isolated targets and retain flexible options for the landing defense.
- Assuming touchdown ends the escort: Stay over the road. The cargo cannot be unloaded safely until the post-landing attackers are removed.
- Following the transport too low during landing: Give it space, climb into an interception position, and watch for the incoming aircraft.
- Rushing the tanker connection: Match speed gradually and make small corrections. Completing the connection triggers the intended ending sequence.
Mission 13 rewards disciplined protection more than raw destruction. Keep the transport at the center of every decision, react immediately when hidden launchers reveal themselves, and shorten every engagement that pulls you away from the escort corridor.