Spoiler warning: This walkthrough reveals every objective change, the Land Battleship encounter, and the mission ending.
Ace Combat 8 Mission 19, “Clearing the Lighthouse,” is a precision battle around the Space Elevator. You must stop another Tonitrus Spear payload, open Land Battleship 2 for a friendly bunker-buster strike, and destroy the battleship without carelessly firing into the elevator’s structure.
The mission is easier when treated as a sequence of protected attack windows. Do not chase every fighter. First stop the climber, then hit the exposed canisters, clear Bigfoot’s approach, disrupt the main guns, attack the breach, and finish the reactivated ship through its heat vents.
Mission 19 objectives at a glance
Mission 19 is titled Clearing the Lighthouse and uses the operation name Silver String. It does not have a unique mission medal listed for the sortie.
| Phase | Immediate objective | Main danger |
|---|---|---|
| Climber interception | Destroy the ascending cargo before it clears the engagement ceiling | Stray fire into the Space Elevator |
| Open hatches | Destroy the Tonitrus Spear canisters before they are loaded | Waiting too long while the battleship keeps moving |
| Bomber approach | Remove AA weapons, UAVs, and fighters from Bigfoot’s route | Letting the bomber reach its pull-up point under fire |
| Main-gun suppression | Repeatedly hit the guns to disrupt their aim | Treating suppression as a permanent kill |
| Breach attack | Concentrate fire on the opening made by the bunker busters | Poor attack angles as the ship turns toward the elevator |
| Final cooling phase | Strike heat vents and the exposed cooling targets | Firing when vents are closed or hitting support structures |
Mission 19 route and loadout plan
No single aircraft or special weapon is established as mandatory for this mission. A balanced multirole setup is a practical choice because the target mix changes repeatedly: fighters and UAVs threaten the friendly bomber, while the battleship presents AA weapons, main guns, a breach, and several temporary weak points.
Favor controllable, accurate attacks over weapons that cover a wide area. The Space Elevator and its support structures sit directly beside the battleship, so a weapon that encourages deliberate target selection is safer than indiscriminate fire. Carry enough standard missiles for the long final phase, and preserve special ammunition for dense defenses or short vulnerability windows.
Your wingmen can help occupy aircraft while you stay on the mission-critical target. Advice to focus on an objective is not a guarantee that allies will clear every threat, so keep checking the radar and radio calls yourself.
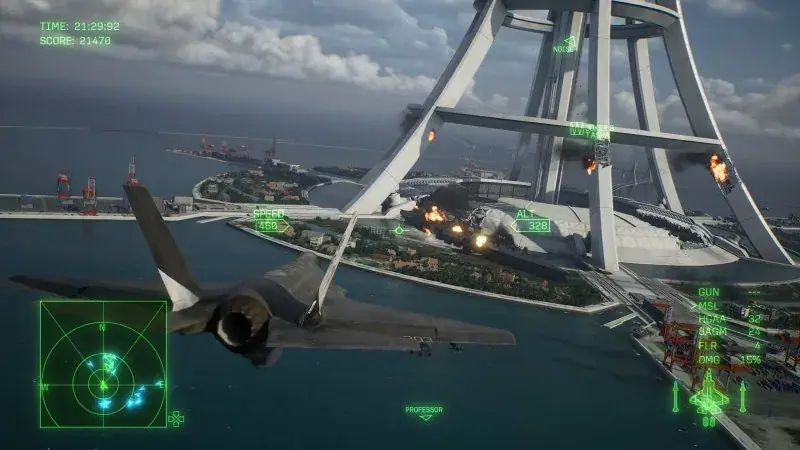
Mission 19's Space Elevator engagement shows the constrained firing area around the tower.
Before the first objective update, establish three habits:
- Break away from fighters that pull you away from the Space Elevator.
- Confirm the selected target before firing near the tower or its supports.
- Keep enough speed and room to reposition instead of making desperate shots between structures.
Phase 1: stop the climber without hitting the elevator
The first urgent target is the climber carrying another Tonitrus Spear payload. One payload has already been sent upward before Joker Flight reaches the operation area; this phase is about preventing another launch.
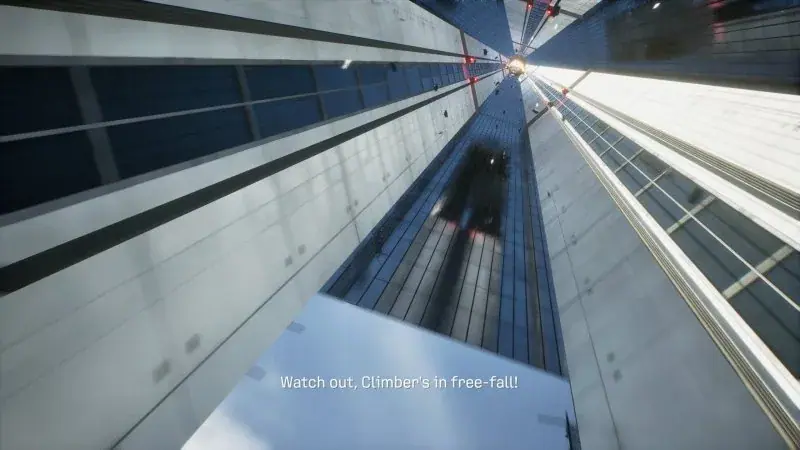
The climber is protected by glass windbreaks. Fire through the glass and hit the cargo rather than shooting around the elevator at random. Support pillars can obstruct the line of fire, so approach from an angle that leaves the climber visible behind the windbreaks. If the pillar fills the center of your sight, reset the run instead of forcing a missile through it.
Use this attack rhythm:
- Select the climber and ignore distant fighters unless one is actively denying your approach.
- Line up with the glass section rather than the support structure.
- Fire through the windbreak when the climber is clearly exposed.
- Break away from the tower immediately after the shot.
- Reacquire and make another controlled pass if the first attack does not finish the target.
The climber is accelerating toward an upper engagement limit, so this is not a phase for clearing the entire radar. Precision matters, but delaying indefinitely is also unsafe. Once destroyed, the climber stops and falls, and the battleship moves to avoid it.
Phase 2: destroy the canisters while the hatches are open
Spoiler warning: The climber’s destruction exposes the battleship’s next launch process.
After the falling climber misses Land Battleship 2, the ship opens its armored hatches while preparing more canisters. Those open hatches create your next attack window.
Target the marked canisters before they can be loaded. Do not waste the opening on ordinary hull sections: the canisters are the immediate objective and the reason the hatches are exposed. Approach from a direction that keeps the open bay visible, fire, and climb or turn away before the battleship’s defenses trap you in a straight line.
If fighters are nearby, evade only as much as needed to preserve the canister attack. A long dogfight trades a temporary vulnerability window for a target that can usually be revisited later. Destroying the canisters ends this launch attempt and moves the operation toward the planned bomber strike.
Phase 3: clear Bigfoot’s bomber corridor
Bigfoot must approach at low altitude, reach its pull-up point, climb, and release bunker busters into the battleship. The bomber is exposed during that ascent, and the mission states that the battleship cannot be opened if Bigfoot is lost.
Your priority is therefore the threat closest to Bigfoot’s route, not necessarily the closest red contact to your aircraft.
- Remove marked AA weapons along the approach.
- Destroy fighters positioned to intercept Bigfoot.
- Switch immediately to UAVs when the battleship launches them against the bomber.
- Check for surviving defenses whenever Bigfoot reports another waypoint or distance update.
- Stay near the corridor as the bomber reaches its pull-up point.
Avoid attacking the armored battleship simply because it is large and easy to see. Before the bunker-buster strike, damage to unrelated hull sections does not replace the need to protect Bigfoot. If a fighter flies away from the corridor, let it go unless it turns back toward the bomber.
When the marked AA weapons are gone, do not assume the corridor will remain clear. New UAVs and aircraft can appear while Bigfoot is still approaching. Continue scanning around the bomber until it begins the final climb.
Phase 4: disrupt the main guns and open the breach
As Bigfoot climbs into firing range, Land Battleship 2 aims its main cannon at the bomber. The immediate instruction is to concentrate fire on the main guns. Your attacks disrupt their aim and reset the salvo, buying Bigfoot time to release its payload.
This is suppression, not a guaranteed permanent destruction. When the guns recover or begin moving again, attack them again. Follow the salvo warnings, line up a clean shot, hit the gun, and then evade instead of remaining in front of the ship.
Keep repeating that cycle until Bigfoot releases the bunker busters. The strike opens a hole on the left side near the bridge. Once the opening is confirmed, stop spending ammunition on the gun unless it is again threatening the operation and redirect attacks into the marked breach.
Attack the breach from a controlled angle
The battleship moves into the residential area and turns toward the Space Elevator, making the breach harder to approach safely. Do not launch through a support pillar simply because the weak point is locked. Circle for an angle that places open sky or the ship itself behind the target.
Concentrate missiles and gunfire on the breach. Direct hits spread damage into the interior; attacks against intact armor are less useful. Enemy aircraft, secondary weapons, and rail-gun warnings will continue during this phase, so make one pass at a time:
- approach with the breach centered and the elevator supports clear;
- release a controlled salvo;
- break away when a warning forces you defensive;
- return as soon as you have another unobstructed line.
The battleship eventually stops after the breach takes enough punishment, but remain alert instead of assuming the sortie is over.
Final phase: attack the exposed heat vents
Major spoiler warning: Land Battleship 2 survives the first apparent shutdown and begins the mission’s final phase.
Damage to the main cooling system forces the ship to vent heat directly. It reactivates its weapons, while infrared detection marks exposed exhaust ports as new targets. These ports are unarmored, but they do not remain continuously available.
Attack only when a marked vent is open. If it closes before your shot, hold your fire, evade, and wait for rising internal heat to expose it again. This avoids wasting ammunition on armor during a long phase in which standard and special weapons can run low.
After the early vents are damaged, additional high-temperature targets appear around the bridge. The ship also exposes cooling hardware associated with its main cannon. Follow the newly marked heat targets rather than returning to the earlier breach.
The safest repeatable pattern is:
- Watch for an open-port call or a newly marked heat source.
- Confirm that no elevator support blocks the firing line.
- Attack the vent during the open window.
- Break away from AA fire, missiles, and rail-gun warnings.
- Reposition while the cooling system cycles.
- Move to the next marked vent instead of continuing to hit a destroyed one.
Do not let the battleship’s radio speech distract you from the target updates. The final objective remains the exposed cooling points. Destroy the last marked target to trigger the battleship’s final destruction.
Failure recovery and cleaner replays
If the climber phase is taking too long, the problem is usually the approach angle. Enter through the glass-facing side, avoid the pillars, and stay with the climber until it is destroyed. Chasing reinforcements first gives the cargo more time to climb.
If Bigfoot remains under heavy attack near the pull-up point, retrace its corridor and look for a missed AA weapon, UAV, or fighter. Damage against the battleship does not compensate for leaving the bomber exposed.
If the main gun keeps reacquiring Bigfoot, shorten your suppression loop. Hit the cannon when it begins aiming, evade, then return when it re-engages. Do not wait for it to behave like a normal permanently destroyed target.
If attacks keep striking the elevator supports, stop firing from the battleship’s far side. Reposition until the marked weak point is backed by the ship or open air. A slower clean pass is better than launching through the tower structure.
If ammunition becomes scarce during the vent phase, reserve missiles for open, marked targets and use downtime to evade rather than firing at closed armor. A failed lock or closed vent is a reason to reset the pass, not to empty the remaining weapons.
Mission 19 ending and result
Ending spoiler warning: The following explains what survives after the final explosion.
Destroying the final heat target eliminates Land Battleship 2, leaving no Land Battleships remaining. The explosion severely damages the Space Elevator, and it initially appears that the Lighthouse may fall. The tower remains standing, although its functions are badly impaired.
The operation prevents additional Tonitrus Spear payloads from being launched through the elevator, but it does not erase the earlier launch: the climber sent up before Joker Flight arrived has already carried one new round into low orbit. Mission 19 therefore ends as a major battlefield victory rather than a complete removal of the orbital threat.